Can’t Sign In or Log In to Steam? Here are 13 Fixes!
Are you having futile attempts where you can’t sign in or log in to Steam?
It’s been a long day of work and you’re just looking to sit back and enjoy some quality games 🎮 on your PC. But alas, no matter what you try, you just simply can’t log in!
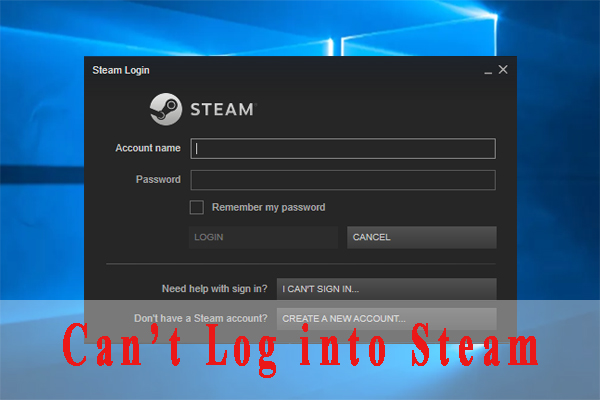
Usually, despite using the correct username and password, users still get shown “you’ve entered incorrectly” error message:

Other times, users might even see the “Steam is having trouble connecting to the Steam servers” error message.

Similarly, you might see an error message saying that “Steam cannot currently process your request”.

Basically, these last 2 error messages are most likely due to issues on Steam’s end that’s not letting you sign in. That’s why, we would recommend checking the Steam server status (Step 5), in case other users are experiencing similar steam login problems as well.
With that said, does this sound all too familiar? Worry not, for we’ve got your back on this.
We’ve done the hard work looking for solutions, and have compiled 13 fixes if you can’t sign in to Steam.
With these steps, you can finally get back to playing those games.
Sound good? Read on!
Note: These steps apply to whichever device you’re using to log in to Steam, mainly Windows and macOS PCs.
Table of Contents
1. Ensure You’re Entering Your Username Correctly and Not Your Email
Usually, most services give you the option of logging in with your registered email or your username. Surprisingly, after having done some research, we’ve come across numerous instances of people inputting their email instead of their username into the username box in the Steam client!
Also, ensure that your caps lock isn’t turned on while entering your Account Name or Password either.

Another important thing to note is that your Steam profile name could be different from your Steam username . It’s easy to think that a large company such as Valve would accept both formats, but for some odd reason, they don’t.
So there you go, the end to your frustrations might be as simple as that!
2. Install Pending Steam Client Updates
As with any software, bugs are inevitable and are a pain to deal with for both the users and the developers. In our case, it could mean that you’re unable to do something like a login just because of a typo or a single line of bad code!
Luckily, the developers 👨💻 and teams at large companies like Valve quickly rectify these issues in the form of updates that you can download. Plus , these updates usually add new features as well!
Therefore, it’s a good idea to keep your Steam client relatively updated.
To check for pending updates on the Steam client:
- First, at the top bar click Steam.
- Then, from the drop-down, choose Check for Steam Client Updates.

If updates are available, the client will proceed to download and install them.
Though it may interrupt the beginning of your gaming session, it’s best to keep your Steam installation updated. This ensures you have the latest bug fixes and features to prevent any future problems like this one.
3. Restart Your Device
Restarting the device whenever you’re troubleshooting is by far one of the most common fixes and for good reason. Sometimes all your device needs is a restart!
Through a quick reboot, you can resolve any temporary issues that may have been affecting the Steam client. Plus, it helps reset your PC’s Internet connection as well. Thus, a simple restart could help if you can’t sign in to the Steam client.
So try logging in after a full reboot and now it may just work!
For Windows
- First, click the Windows icon at the bottom left corner.
- Then from the Start menu, click the Power button.
- Finally, choose Restart.

For macOS
- The easiest way to prompt a restart is, click the Apple Menu, situated at the top left corner of the screen.
- Then, from the drop-down, select Restart.
- Finally, at the subsequent message asking “Are you sure you want to restart?”, click Restart.

4. Test Your Internet Connection
As usual, we suggest checking your device’s Internet connection. It’s important to know if your device has a stable connection, allowing it to interact with Steam’s services.
While there are countless sites that can test your Internet connection, we recommend running Ookla’s speed test to determine if it’s the root of the issue.

Once your results have been shown, check if the latency and speeds are up to par. Latencies of below 25ms as well as download and upload speeds of at least 5Mbps are sufficient to use Steam’s services.
5. Check Steam’s Server Status
So far, we’ve been trying to fix things that are on our side — the client’s side. However, as the saying goes, it takes two to tango. 💃
Like our own devices, Steam’s servers may have an issue that’s preventing users from logging in. Server maintenance, attacks, and sudden outages are just a few of the reasons why servers may be down.
Without the full and proper functionality of the servers, users may run into issues with Steam’s services, such as our current issue – being unable to log in.
Well, how do we determine if it’s a server-side issue?
Using DownDetector
Thankfully, there is an easy way to do so! A plethora of websites that track the status of various popular servers are just a Google search away.
For this, we recommend visiting Downdetector’s Page for Steam.

In addition to immediately informing you about the server’s status, it also provides data about the rough locations of those who reported it. Hence, you can find out specifically which region of Steam’s services are down.
While there’s an embedded Twitter feed to access Steam’s support account, it hasn’t been active since 2017, so it doesn’t prove to be useful in this scenario.
Having all this information at a glance will allow you to quickly determine if there’s an issue on their side and not yours.
Using Steam’s Official Stats
Additionally, you could also use Steam’s official statistics website here . While it doesn’t have the same type of info as Downdetector, such as location tracking, it provides the number of concurrent Steam users and which games they’re playing.
If the number has dropped significantly, chances are that you’re not alone with the Steam login problems.

These server-side issues usually get resolved in a few hours to a day and functionality should be restored thereafter. However, it still doesn’t hurt to bring it up to Steam’s attention by emailing them at [email protected] .
6. Try the Web Browser Version of Steam
We suggest trying logging in to Steam’s web portal. The web version may have a slightly different way of accessing Steam’s database or have a bug fix that the client has yet to receive. Thus, potentially allowing you to log in.
The web browser version can be accessed here after logging in with your account credentials.

7. Locked Out of Steam? Use a VPN
It’s likely that you’re endlessly attempting to login back to your account to play those games. Such is the life of troubleshooting when you can’t sign in to Steam, and that’s why we’re here to help.
However, you’re greeted with a dreaded message – you’ve been locked out for too many attempts!
Great. Another problem. Thankfully, there is a solution: a Virtual Private Network or VPN!
To sum it up, VPNs encrypt and anonymise your internet traffic 🕵️♂️ via its own private server in another location. Thus, increasing your security and potentially internet connection speed. As a result, your IP on the Internet is not your own anymore but rather the VPN’s own IP whenever it’s active.
Overall, by using a VPN, Steam will not block you out anymore when you’re trying to log in since it thinks you’re on another network!
If you don’t feel like using a VPN, note that the lock out period is 30 minutes .
For this, we recommend using NordVPN, which we’ve found works wonders with the Steam client.
8. Run the Network Troubleshooter (For Windows 10)
While we’re still on the topic of diagnosing our own device, we should troubleshoot its connectivity. Fortunately, Windows has a nifty tool built-in that will attempt to search for any problems in your network.
Thus, network connectivity problems could be the reason you can’t sign in to Steam as well.
Here’s how you can access the network troubleshooter:
- To start, open the Settings window and go to the Network & Internet section.

- Then, ensure that you are in the Status section on the left sidebar.
- Following that, scroll down the right sidebar, and click on the Network troubleshooter option.

- Finally, the troubleshooter will start automatically. Follow its instructions if it detects anything abnormal about your network.
9. Scan Your Device for Malware with Malwarebytes
Nobody wants any sort of malware 👾 on their device! These annoying software somehow make their way onto your device and can potentially wreck it or destroy your data. All in all, costing you a fortune!
In fact, that may very well be the case you can’t log in to Steam. Hence, some spyware, malware, trojans, etc. could be on your computer and interfere with the Steam client.
Well, how do we get rid of it? Fortunately, there are lots of free antivirus programs on the Internet.
However, we recommend using Malwarebytes .

We have personally used Malwarebytes for our computers and it has proven to be an effective and reliable anti-malware program.
Not to mention there is a completely free version !
Furthermore, the overall size of the program is small, saving you those precious gigabytes on your device and staying out of the way. Malwarebytes is available for Windows, macOS, Chrome OS, Android, and iOS.
After your antivirus software has done its job, restart your device (Step 2) and try logging in again.
10. Reinstall the Steam Client
Moving on, there could be corrupt program files lurking around or installation issues with the Steam client. By reinstalling, you ensure every part of the code is totally new and without corruption.
Hence, this saves you a lot of time since you cover all bases in one fell swoop! So after a quick reinstall, check if you still can’t sign in to the Steam client.
Note: Make sure to keep your SteamLibrary in a safe place before reinstalling, as it could be deleted during uninstallation! Just remember to not delete the steamapps file and back it up or move it to somewhere else temporarily. You can find this in the Program Files, and then under Steam. (C:\Program Files\Steam)

After uninstalling, you can download Steam’s latest client build for your operating system here . Then, you can also restore your backed up steamapps file.
Additionally, for reference, you can check out Steam’s guide to reinstall the client here.
For Windows
- Firstly, open the Run prompt by pressing the Windows and R key together, then type appwiz.cpl and press OK.

- After that, from the list of programs, look for Steam by the publisher Valve Corporation, right-click it, and select Uninstall. Follow the instructions in the uninstaller. It should tell you when it’s done uninstalling.

- Next, open the Run prompt again by pressing the Windows and R key. Then, next to Open type regedit, and click OK.

- At the Registry Editor window, from the left sidebar, there are two files you should delete. For the first one, under HKEY_CURRENT_USER, and Software, delete the Valve file.

For the second one, if you’re running 32-bit Windows, under HKEY_LOCAL_MACHINE, and Software, delete the Valve file. Conversely, for 64-bit Windows, under HKEY_LOCAL_MACHINE, Software, and WOW6432Node, delete the Valve file.

Once that’s done, you can restart your computer, or straight away download and install the Steam client file from here.
For macOS
Here is the main article from Apple themselves should you want to refer to it.
Using Launchpad to Delete an App
- To begin, open Launchpad by clicking it in the Dock or opening it from your Applications folder. You can also pinch closed with your thumb and three fingers on your trackpad.
- Next, type “Steam” in the search field at the top of the screen. Alternatively, you can swipe right or left with two fingers on your trackpad to show the next or previous page to manually find its icon.
- Then, press and hold the Option (⌥) key, or click and hold any app until the apps jiggle.
- Finally, click the “x” next to the app that you want to delete, then click Delete to confirm. The app is deleted immediately.

Apps that don’t show “x” either didn’t come from the App Store or are required by your Mac. To delete an app that didn’t come from the App Store, use the Finder instead.
Using Finder to Delete an App
- Firstly, locate the Steam app in the Finder. Most apps are in your Applications folder, which you can open by clicking Applications in the sidebar of any Finder window. Or use Spotlight to find the app, then press and hold the Command(⌘) key while double-clicking the app in Spotlight.
- Then, drag the Steam app to the Trash, or select right-click the app and choose Move to Trash .

- After that, if you’re asked for a user name and password, enter the name and password of an administrator account on your Mac. This is probably the name and password you use to log in to your Mac.
- Finally, to delete the app, open the Trash, right-click it, and select Empty Trash .

11. Disable Interfering Background Applications
Reinstalled the Steam client but still can’t sign in to Steam? There’s one last thing we can do apart from a full OS reinstall (which no one likes).
What we suggest is to disable high bandwidth applications on your device such as FTP (File Transfer Protocol) and P2P (peer-to-peer) clients. Some examples of these programs include Filezilla and qBittorrent.
These high bandwidth applications, as their name suggests, require a lot of Internet. Typically, these clients are prioritized by your computer for incoming and outgoing bandwidth.
It’s for that very reason that your Steam client may be unable to connect to its servers when you’re trying to log in. Thus, it’s actually quite similar to how you get high ping and unstable gameplay if you have something downloading or uploading in the background!
Hence, if you have any of them running, try pausing any active connections or outright close out the programs.
12. Try Disabling the Firewall on Your PC
A firewall’s purpose 🔥, whether software or hardware-based, is to “filter” out any unwanted connections or data by blocking your local network’s access to them. As such, if your network hasn’t been configured correctly to accept incoming connections from Steam’s servers, you won’t be able to use their services!
That being said, a misconfigured firewall could be the cause if you can’t sign in at the Steam client.
Therefore, we suggest disabling your firewall to see if it’s causing the problem :
For Windows
- Firstly, click the search button (Windows + S) next to the Start Menu, then search for and open Virus & threat protection.

- After that, click Manage Providers at the right.
- Then, under Firewall, select Open app.


- Next, under Windows Defender Firewall, turn the switch off.

- Finally, at the subsequent system message, choose Yes to allow the changes.
For macOS
- To start, open the Apple Menu by clicking the Apple logo at the upper left corner, and from the drop-down, select System Preferences.
- Next, at the System Preferences menu, choose Security/Security & Privacy.
- On the following window, at the top menu, click the Firewall tab.

- Following that, click the lock icon at the bottom-left corner.
- Then, enter your admin username and password to allow changes to the settings.
- Finally, click the Turn Off Firewall button.

After switching off the firewall, you can straight away try opening and signing in to the Steam client. Check if you still can’t sign in to your Steam account.
Reminder: Turn on your firewall again before opening your web browser or any other apps, so your PC is well-secured. For this, just follow the exact same steps as before, and finally, turn the firewall switch on.
Note: Depending on how your device is set up, it may be using a custom firewall and not the built-in one. Please consult your software or hardware’s manual in order to change its firewall’s settings.
13. Configure Your PC’s Firewall to Allow the Steam Client
From the previous step, if you find that restrictive settings in your Firewall are causing your login issues, we can configure it to allow the Steam client.
Hence, similarly, we can adjust some of the firewall’s settings to ensure a stable connection to Steam’s servers. Thus, this ensures the Steam client has all the freedom to access its servers correctly.
List of ports
Here is the list of ports that you need to enable to ensure Steam gets a stable connection:
To log into Steam and download content:
- HTTP (TCP remote port 80) and HTTPS (443)
- UDP remote port 27015–27030
- TCP remote port 27015–27030
- UDP remote port 27000–27100: Game traffic
- UDP local port 27031-27036: Remote Play
- TCP local port 27036: Remote Play
- UDP remote port 4380
For generic Steam HTTP/HTTPS requests, your proxy should allow the following domains:
- steampowered.com
- steamcommunity.com
- steamgames.com
- steamusercontent.com
- steamcontent.com
- steamstatic.com
- akamaihd.net
Now that we have the list of approved ports and websites, we can use this information to make our firewall allow them:
For Windows
To add Steam to the allowed apps list:
- Firstly, click the search button (Windows + S) next to the Start Menu, then search for and open Allow an app through Windows Firewall.

- Then, click the Change Settings button.
- Next, find Steam and Steam Web Helper in the list of programs. If it’s there, tick all its boxes to allow it through your PC’s firewall. If not, skip to the next step.

- With Steam selected, click the Remove button. Confirm that you want to remove the entry.

- Next, click the Allow another app button.

- In the “Add an app” window, click the Browse button.

- After that, navigate to the Steam program directory (e.g. C:\Program Files (x86)\Steam) and double-click or open steam.exe.


- Lastly, click the OK button to close the Allowed apps panel.
To add Steam ports:
- Firstly, click the search button (Windows + S) next to the Start Menu, then search for and open Windows Defender Firewall with Advanced Security.
- Next, select Advanced settings and highlight Inbound Rules in the left pane.
- Then, right-click Inbound Rules and select New Rule .

- After that, add the port you need to open and click Next .

- Similarly, add the protocol (TCP or UDP) and the port number from before into the next window, and click Next .

- Moving on, select Allow the connection in the next window and hit Next .

- Select the network type depending on Steam’s recommendations in the list above and click Next .
- Then, name the rule something meaningful and click Finish .
- Finally, repeat steps 2-8 for Outbound Rules .

For macOS
For macOS, since it uses an application-based firewall and not a port-based one, there are no steps to add the ports.
For starters, follow the steps in fix 12 to access the Firewall configurations menu, through your mac settings (System Preferences).
Then, click Firewall Options.

After that, click the Add button under the list of services, then select the services or apps you want to add. After an app is added, click its up and down arrows to allow or block connections through the firewall.

Once that’s done, try logging in! Check if you still can’t sign in to Steam.
14. Contact Steam Support
Tried all the fixes above and you still can’t log in to Steam? At this point, we suggest contacting Steam themselves at [email protected] so that they may assist you.
Be sure to explain and elaborate your issue to the best of your ability. Doing this can help them to replicate your bug to find the root of the issue.

Conclusion
You’ve reached the end of our guide! Those are the 13 fixes that we’ve found to be the best at resolving any problems when you can’t log in or sign in to Steam.
As with any troubleshooting, it’s always good practice to try logging in again after attempting each fix. That way, you can figure out what exactly was causing the issue, and potentially save yourself some time in the future!
With that being said, hopefully, you’re now able to log in to the Steam client and continue gaming! 🎮
Before you go, share in the comments below:
- Is Steam not letting you log in?
- Have any other suggestions to fix these Steam login issues?
- What other errors are you encountering with Steam?
Feel free to share this post with your lads who can’t sign in to their Steam accounts! 🤗
Can’t Log into Steam on Windows 10 — Here Are Top 6 Solutions [Partition Magic]
By Ariel | Follow | Last Updated January 29, 2021
Summary :
A great many users complain that they can’t log into Steam. Sometimes, Steam won’t remember password. Are you troubled by this vexing problem? Now, you come to the right place. This post of MiniTool will provide you with several effective fixes.
Quick Navigation :
Usually, Steam will ask for your password each time you log in to the account for safety. In order to play faster, lots of users want to make Steam remember their password so that they can skip the login screen. Sometimes, however, Steam won’t remember password. This issue can be caused by your Steam account settings, corrupt game cache, and even the network connection.

A lot of users reported that their games keep alt tabbing. Are you also bothered by this issue? Don’t worry. This post shares you with several effective fixes.
Fix 1. Change Steam Account Settings
If you can’t log into Steam since the client doesn’t remember password, then you need to check your account settings. Here’s how to do that:
Step 1. Launch your Steam client and then navigate to Settings.
Step 2. Select Account from the left panel, and then untick the checkbox for Don’t save account credentials on this computer.
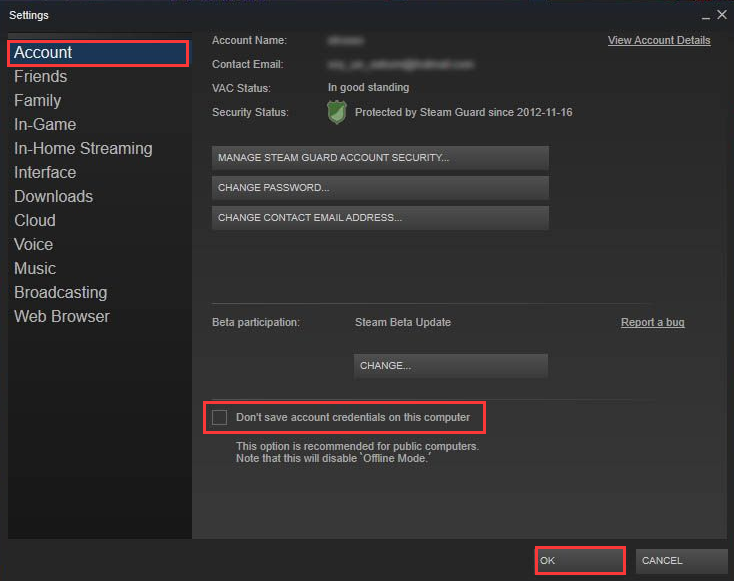
—image from YouTube
Step 3. Click on OK to save the change.
Now, restart the client and see if you still can’t login to Steam without entering a password.
Fix 2. Refresh the Steam Login
Another simple solution is to refresh the Steam login settings and game cache. If you can’t login to Steam without password, you can try the following steps.
Step 1. Launch your Steam client without asking you to save the password.
Step 2. Exit your Steam account right after the platform loads and don’t launch any games.
Step 3. Log in to your Steam client again. At this time, ask it to remember your password.
Fix 3. Clean the Steam Local Folder
As you know, the Steam local folder is a temporary folder that can help you load into games faster. However, once the folder gets corrupted, you may encounter the problem. To fix the issue, you can delete the Steam local folder.
Step 1. Press Win + R keys to open the File Explorer and then navigate to the following path.
C:\Users\YOURUSER\AppData\Local\Steam (Replace YOURUSER with the username of your PC)
Step 2. Inside the Local folder, select the Steam local folder and delete it.
Now, restart your computer and see if you still can’t log into Steam without a password.
Fix 4. Make Your Laptop Always Connect to the Same Wi-Fi Network
Some users reported that the issue “cant log into Steam” can happen if switching different Wi-Fi networks too often. This could be a possible reason for Steam won’t remember password. In this case, you’d better make your laptop connect to the same Wi-Fi network.
Also, you can disable the automatic connection feature for an unused Wi-Fi network.
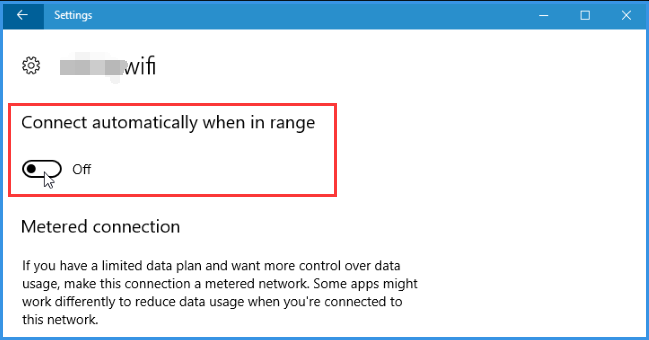
Step 1. Press Win + I keys to open the Settings window, and then go to the Network & Internet section.
Step 2. Select the Wi-Fi from the left pane, and select the unused Wi-Fi network name and toggle off the switch for Connect automatically when in range.
After that, relaunch the client and see if the “Steam not logging in” problem has been resolved.
Fix 5. Run Network Troubleshooter
As mentioned above, the “Steam not logging in” can be caused by the network connection. If your network connection is inconsistent and unstable, you can’t log into Steam. For that, you can run the network troubleshooter to check if your laptop is connected to the network properly.
Step 1. Open the Settings window again and go to the Network & Internet section.
Step 2 Scroll down the right sidebar and click on the Network troubleshooter option from the right side.

Now, this diagnostic tool will detect the network issue automatically. Once the process complete, restart and see if you still can’t log into Steam.
Fix 6. Reinstall the Steam Client
If you still can’t log into Steam after trying all the above methods, you may consider performing a clean installation of the Steam client. Here you can follow the steps below:
Step 1. Press the Win + R keys to open the Run box. Then type appwiz.cpl in it and hit Enter.
Step 2. Find the Steam from the list of installed programs, and then right-click and select Uninstall.
Step 3. After the uninstallation completes, click here to download the latest version of Steam and install it on your computer.
Step 4. Move the Steamapps folder you have backed up to the Steam directory. At this time, the Steam missing content manifest issue should be fixed.

Have you come across Fallout New Vegas crashing? A lot of users are troubled by this issue. Now, you will obtain several solutions from this article.
ABOUT THE AUTHOR

Position: Columnist
Ariel is an enthusiastic IT columnist focusing on partition management, data recovery, and Windows issues. She has helped users fix various problems like PS4 corrupted disk, unexpected store exception error, the green screen of death error, etc. If you are searching for methods to optimize your storage device and restore lost data from different storage devices, then Ariel can provide reliable solutions for these issues.
Что делать при ошибке Steam client not found
Даже если вы пользуетесь Steam не один год, и за все время использования у вас не возникало никаких проблем, то все равно вы не застрахованы от ошибок багов клиента. Примером является ошибка Steam Client not found. Подобная ошибка приводит к тому, что вы абсолютно теряете любой доступ к Steam вместе с играми и торговой площадкой. Поэтому, для продолжения пользования Steam вам необходимо решить данную проблему, читайте далее чтобы узнать как решить проблему Steam Client not found.
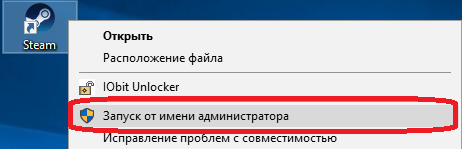
Отсутствие прав пользователя
Если вы запускаете приложение Steam, не имея прав администратора, то это может являться причиной возникновения проблемы Steam Client not found. Клиент пытается запуститься, но у данного пользователя отсутствуют нужные права в Windows и операционная система запрещает запуск программы, в результате чего вы получаете соответствующую ошибку. Для решения этой неполадки вам необходимо запустить программу от имени администратора. Для этого нужно войти в учетную запись администратора на компьютере, а затем, кликнув по приложению правой кнопкой мыши необходимо выбрать пункт «запустить от имени администратора».
После этого Steam должен запуститься в обычном режиме, если это помогло и решило проблему то в дальнейшем для того, чтобы не кликать каждый раз по иконке и выбирать пункт запуска от имени администратора, вы можете установить данный параметр по умолчанию. Вам следует открыть настройки ярлыка запуска Steam, кликнув правой клавишей по ярлыку, а затем выбрав пункт свойства.

Во вкладке «Ярлык» выбираем кнопку «Дополнительно», в появившемся окне можно поставить галочку возле надписи «запуск от имени администратора» и подтвердить свое действие нажатием кнопки OK.

Теперь при каждом запуске Steam будет открываться с правами администратора и ошибка «Steam Client not found» боше вас не побеспокоит. Если же данный способ не помог избавиться от проблемы то попробуйте вариант, описанный далее.
Удаление поврежденного файла конфигурации
Причиной возникновения ошибки может быть поврежденный файл конфигурации. Он находится по следующему пути , который вы можете вставить в проводник Windows:
C:\Program Files (x86)\Steam\userdata779646\config
Перейдите по этому пути, далее вам будет необходимо удалить файл, который называется «localconfig.vdf». Также в данной папке может находиться временный файл со схожим названием, вам следует удалить и его тоже. Не бойтесь того, что вы повредите файл. После того, как вы попробуйте запустить Steam еще раз он автоматически восстановит удаленные файлы, то есть отсутствие поврежденных файлов автоматически заместится новыми и исправными. Так вы избавитесь от ошибки «Steam Client not found».
Если же и этот способ не помог, то остается только обратиться в службу поддержки Steam на официальном сайте, используя браузер, установленный на вашем компьютере. О том, как обратиться в техподдержку Steam вы можете прочитать соответствующую статью. Сотрудники техподдержки Steam отвечает оперативно, поэтому вы сможете решить свою проблему в наиболее короткие сроки.
Надеемся, что это статья поможет вам избавиться от ошибки «Steam Client not found». Если вы знаете другие способы решения данной проблемы, то отписывайтесь в комментариях и делитесь ими со всеми.
Помимо этой статьи, на сайте еще 12327 инструкций.
Добавьте сайт Lumpics.ru в закладки (CTRL+D) и мы точно еще пригодимся вам.
Отблагодарите автора, поделитесь статьей в социальных сетях.
http://www.partitionwizard.com/partitionmagic/cant-log-into-steam.html
http://lumpics.ru/steam-client-not-found-error-what-to-do/